- React at Preact
- Introduction
- 1. Prerequisites
-
2.
React Basics
- 2.1. Rendering Concepts
- 2.2. Your First React App
- 2.3. State vs. Props
- 2.4. Links
- 3. Component Best Practices
- 4. Our Components
- 5. Flux & Reflux
-
6.
CSS & Animation
- 6.1. How Preact does CSS in React
- 6.2. Links
- 6.3. Authentication
- 7. Testing
-
8. Configuration
- 8.1. Webpack
- 8.2. Mock API Server
- 8.3. Links
- 9. Dev Tools
- 10. External Resources
Reflux: Authentication Flow
Authentication is an important part of any SaaS app, and doing authentication on a single-page app adds some complexities of its own. Here we will discuss how to create an authentication flow for your React app.
If you want to jump straight to the repo, it's on GitHub ready for you.
A Note about Security
It's important to note that because this is a client-side app, it is critical to correctly check authentication on each API call at the server. Authentication tokens and authorization status can all be faked at the client level in local Javascript. For instance, a user could (in theory) change their access level tell your single page app that their level is higher than you want.
This is generally not a problem assuming that every API call correctly uses the token, validates it, and returns only things which the user has access to see. As a simple example, you may show a list of people on a page and only allow "admin" users to see email addresses. This means that in addition to not rendering the email field when a non-admin is using the site, you must also not send the email field in the API call for a non-admin. If you merely block it client-side, you are leaking data.
In contrast, a server-rendered app (e.g. Ruby on Rails) has a simpler task in that it can render data based on user access because the raw data never is sent to the client.
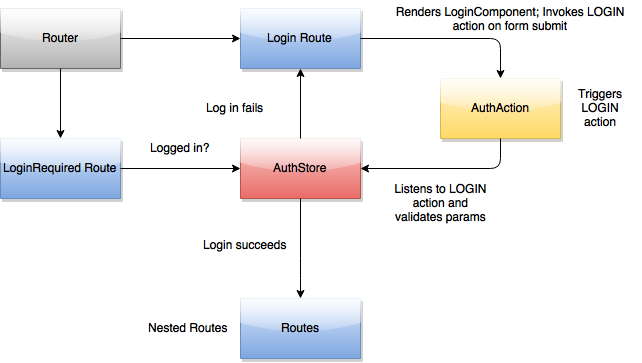
The System
This is a basic diagram of our Authentication flow. We'll dive deeper into each portion in the sections below.
Router
First, let's start with our Router.
We use react-router in our app and found it to be the best and most complete option for handling multi-page apps. It provides a concept of nested Routes, as shown below in the module.exports and is the basis for how we secure certain sections of the app.
// routes.jsx

var React = require('react');
import Router from 'react-router';
var Route = Router.Route;
var DefaultRoute = Router.DefaultRoute;

import Master from './pages/Master';
import Home from './pages/Home';
import Admin from './pages/Admin';
import Login from './pages/Login';
import LoginRequired from './util/RouteHelpers';

module.exports = (
  <Route>
    <Route handler={Login} name="Login" path="Login"/>
    <Route handler={LoginRequired}>
      <Route handler={Master}>
        <DefaultRoute handler={Home} name="Home"/>
        <Route handler={Admin} name="Admin" path="admin">
      </Route>
    </Route>
  </Route>
);
It's important to consider the heirarchy of your routes, especially when dealing with authentication. By properly nesting the routes in your app, you can ensure that a user must be logged in before she can view content. As you can see, our Master, Home, and Admin routes are nested under our LoginRequired route. This means that no user can access any sub-login route without first going through the LoginRequired route.
LoginRequired
LoginRequired is a component that determines if a user is logged in, and eventually redirects to the LoginPage when necessary. See below:
// util/RouteHelpers.js

import React from 'react';
import Router from 'react-router';

import AuthStore from 'stores/AuthStore';

var LoginRequired = React.createClass({
  statics: {
    willTransitionTo: function (transition, params, query, callback) {
      if(!AuthStore.loggedIn()){
        // go over to login page
        transition.redirect('/login', null, { redirect: transition.path });
      }
      callback();
    }
  },
  render () {
    return (
      <Router.RouteHandler/>
    );
  }
});

module.exports = { LoginRequired };
LoginRequired checks the return value of AuthStore.loggedIn() (which we will implement shortly). If this returns true, the user is granted access to the nested routes by rendering Router.RouteHandler. If this returns false, the user is redirected to our LoginPage, which renders the log in form.
To learn more about willTransitionTo(), check out the react router docs.
LoginPage
Let's assume you are not already logged-in, so you get redirected to the LoginPage from the LoginRequired helper.
// pages/Login.jsx

import React from 'react';
import Router from 'react-router';
import Reflux from 'reflux';

import AuthStore from 'stores/AuthStore';
import AuthActions from 'actions/AuthActions';

var Login = React.createClass({
  mixins: [
    Router.State,
    Router.Navigation,
    Reflux.connect(AuthStore),
    Reflux.ListenerMixin
  ],

  componentDidMount () {
    this.listenTo(AuthStore, this._onAuthChange);
  },

  _onAuthChange(auth) {
    this.setState(auth);

    if(this.state.loggedIn){
      var redirectUrl = this.getQuery().redirect || '/';
      this.replaceWith(redirectUrl);
    }
  },

  _handleSubmit(event) {
    event.preventDefault();

    AuthActions.login(
      React.findDOMNode(this.refs.email).value,
      React.findDOMNode(this.refs.password).value
    );
  },

  render() {
    var errorMessage;
    if (this.state.error) {
      errorMessage = (
        <div className='state-error' style={{ paddingBottom: 16 }}>
          { this.state.error }
        </div>
      );
    }

    var formContent;
    if (this.state.user) {
      formContent = (
        <div>
          <p>
            You're logged in as <strong>{ this.state.user.name }</strong>.
          </p>
        </div>
      );
    } else {
      formContent = (
        <div>
          { errorMessage }
          Email: <input defaultValue="iwritecode@preact.com" ref="email" style={{ maxWidth: "100%" }} type="email" />
          <br/>
          Password: <input defaultValue="wearehiring!" ref="password" style={{ maxWidth: "100%" }} type="password" />
          <br/>
          <button onClick={ this.handleLogout }>Log In</button>
        </div>
      );
    }
    return (
      <form onSubmit={this._handleSubmit}>
        { formContent }
      </form>
    );
  }
});
module.exports = Login;
When the user clicks the Log In button, the email and password are fetched from the DOM by the _handleSubmit() function. This function calls AuthActions.login(), triggering AuthStore.onLogin(), which makes the actual API call. Following the API call, the AuthStore state changes. Our component is listening for store changes, and calls Login._onAuthChange(), which updates the app state. Assuming the login was successful, your user will now be redirected to the Home page.
AuthActions
Our AuthActions file is simple. It simply declares the actions that the AuthStore will be listening to.
// actions/AuthActions.js

import Reflux from 'reflux';

export default Reflux.createActions({
  login: {children: ['completed', 'failed']},
  logout: {}
});
AuthStore
// stores/AuthStore.js

import Reflux from 'reflux';
import Actions from 'actions/AuthActions';

var renderTimeout = 250; // set a timeout to simulate async response time

var AuthStore = Reflux.createStore({
  listenables: Actions,

  init () {
    // pull cached token if one exists
    this.jwt = localStorage.getItem('jwt');

    this.claims = this.parseJwt();
    this.error = false;
    this.loading = false;
  },

  getState () {
    return {
      loading: this.loading,
      error: this.error,
      user: this.userFromClaims(),
      loggedIn: this.loggedIn()
    };
  },

  userFromClaims () {
    // will want to do some cleanup of the claims
    // because they're designed to be very small field names for xfer size
    return this.claims;
  },

  loggedIn () {
    // helper
    return this.claims !== null;
  },

  changed () {
    this.trigger(this.getState());
  },

  onLogin (email, password) {
    this.loading = true;
    this.changed();

    // fake API simulation
    setTimeout(function() {
      var auths = require('./AuthStore.sampleData.json');
      Actions.login.completed(auths[`${email}:${password}`]);
    }, renderTimeout);
  },

  onLoginCompleted (authResponse) {
    if(authResponse){
      this.jwt = authResponse.jwt;
      this.claims = this.parseJwt();
      this.error = false;

      localStorage.setItem('jwt', this.jwt);
    } else {
      this.error = 'Username or password invalid.';
    }

    this.loading = false;
    this.changed();
  },

  onLogout () {
    // clear it all
    this.jwt = null;
    this.claims = null;
    this.error = false;
    this.loading = false;
    localStorage.removeItem('jwt');
  },

  parseJwt () {
    if(this.jwt === null){ return null; }
    return JSON.parse(atob(this.jwt.split('.')[1]));
  }

});

module.exports = AuthStore;
Once our AuthStore receives the login() action from our AuthActions, it automatically calls AuthStore.onLogin().
When the API successfully authenticates the user, and returns success, we call Actions.login.completed(), which calls AuthStore.onLoginCompleted(). This assigns the new data, and calls this.trigger(this.getState()) (i.e, triggers with the new state). The LoginPage is subscribed to AuthStore changes, so the state change will re-render this component with a logged in user.
We decided to use JSON Web Tokens (JWT) for our authentication, and made the decision to store our JWTs in localStore, as opposed to cookies (click here, and scroll down to 'Where to Store Your JWTs' to read about the differences). You should note that when developing a single page app, you need to authenticate every request on the server side.
Once you have a token for the user, you'll want to pass it in the Authorization header as a Bearer token for every subsequent API request. There are many resources on the web to show the client/server logic for this flow, and it largely depends on what server framework you're using to host your API. It's outside the scope of this document, but we may share our approach in a future post.
Note: In this sample app, we're not actually making a real API call, but instead using a timeout and the sampleData file to simulate an async call. This setTimeout method is where you would swap in whatever server method you need to authenticate the username/password and return a token, then call Actions.login.completed with the server response.
Our AuthStore.sampleData.json mimics JWT authentication, and looks like this:
// stores/AuthStore.sampleData.json

module.exports = {
  "iwritecode@preact.com:wearehiring!": {
    "jwt": "DOESNTMATTER.eyJleHAiOi0xLCJpZCI6IjEiLCJuYW1lIjoiR29vbGV5IiwiZW1haWwiOiJnb29sZXlAcHJlYWN0LmNvbSJ9.DOESNTMATTER"
  },
  "awesome@preact.com:asdfasdf": {
    "jwt": "DOESNTMATTER.eyJleHAiOi0xLCJpZCI6IjIiLCJuYW1lIjoiSGFybGFuIExld2lzIiwiZW1haWwiOiJoYXJsYW5AcHJlYWN0LmNvbSJ9.DOESNTMATTER"
  }
}
Note that the only depedencies needed for this authentication are the following:
// package.json

dependencies: {
 "react": "^0.13.3",
 "react-router": "^0.13.3",
 "reflux": "~0.2.4"
}
To see it all working together, you can clone our simple auth example repo and run it locally!